Saturday, March 26, 2016

Playing with paper and paint....

The other night I folded up a piece of paper and wondered what would happen if I cut into it and unfolded it... what I got was a pleasant surprise! It was so fun to see the design appear!  I felt like a kid in kindergarten, and went on to make a few more.  Then I decided to go on to do some experiments with paint, using my gelli plate, and the paper designs.  I thought I would show you the things that I made...they aren't finished pieces, just fun experimentation to see what happens when combining things together.

Here is my design cut into a folded piece of 8.5x11 printer paper... and the full unfolded piece, and some pictures of the painted and combined designs...
Thank you for visiting and taking a look at my artwork!


 I added some oil pastel to this one to accentuate the colors


Sunday, December 7, 2014

Printmaking

I recently took a class in mixed media and collage.  We also did some printmaking, which I had never done before, especially not with a press!  We made a monotype print, and also a relief print made from a piece of foam core board, with the design cut out.

I kind of liked my little design cut in the board, but after a few printings, the design began to deteriorate. So, at home I decided to cut one from linoleum. 

This lead to more interest in block print making, and especially reduction prints! I remember seeing some prints like this at an art festival, and I wondered how did it happen that you could do a lino or wood cut and the printed design would have many different colors?

I found out that when doing a print like this, the artist carves out only part of the design for the first color, prints it, then carves out for the second color, and so on.  You need to print this on as many pieces of paper you want to wind up with right from the beginning, because parts of the design will be carved away and lost at each stage.  
It seems that it would be very hard to think of which colors and which part to carve at each stage, but after watching a few videos about it on youtube, it became clearer.

The design is drawn on the block, then only the parts you want to stay white (if any) are carved.  The colors are printed lightest to darkest.  So, you print the block with the first color, and the areas you had carved are still the white of the paper.  Then the areas you want to remain the color you just printed are carved out.   The second color prints over the first, but your carved out areas are saved.  And so on.... for each color. 

I wanted to give this a try, so using a sheet of fun foam, I glued it to a board and drew a quick design of a cup and saucer on it.  I carved out what I wanted to stay white, and printed it twice with a light gray.  Then I cut out the parts I wanted to stay gray, and printed the next color, red.  It could be tricky to line the block back up with the print, but I got lucky.   It was awesome!! I was so excited to see it happen.  I used some black and printed again.  ( I added those little pre cut self adhsive foam flower shapes, it was hard to cut them out with the x acto knife).

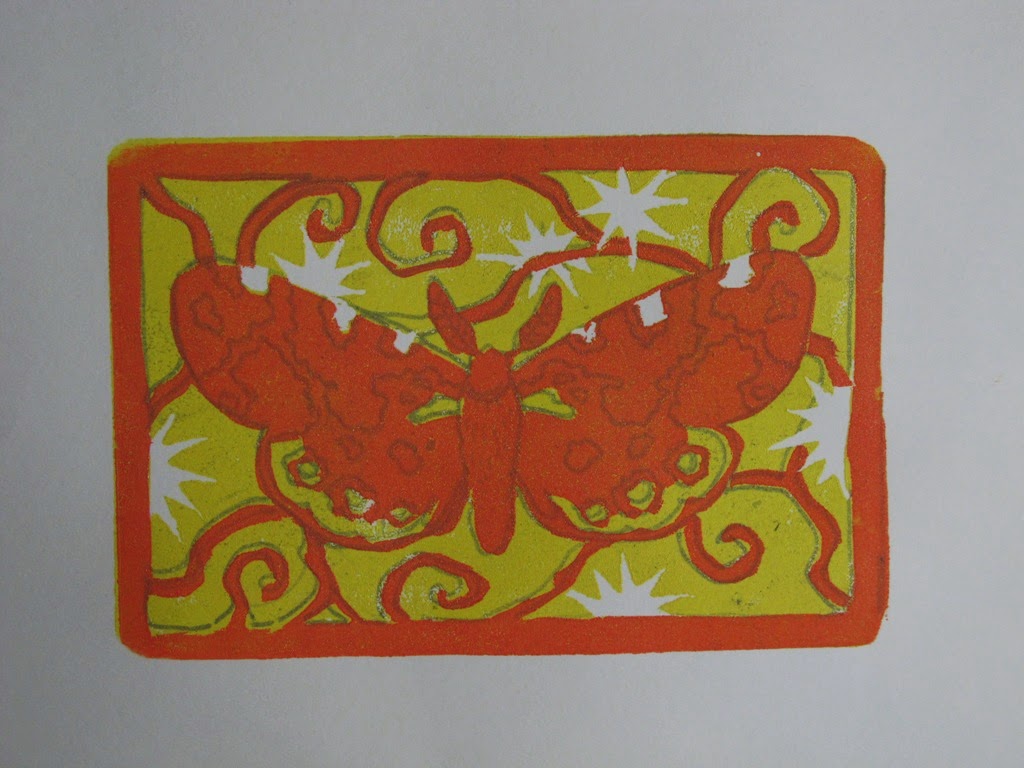
Now that I had the idea, I thought I would get fancy and do a much more detailed design.  I picked out a butterfly design.  I glued a piece of self adhesive fun foam to a foam core board, without peeling off the backing. I was thinking that when I cut the pieces out, they would come right up off of the backing.  I drew the butterfly and some vine shapes in the background with a ball point pen.
I used an x-acto blade to cut out the peices I wanted to stay white, and printed it with yellow ink. The pictures might be confusing at this point, the foam is also yellow. 

Here is my print, I was surprised to see my pen drawing came up with the ink and printed... this could be good for another sort of print, but not this one!  Next time I'll have to remember to draw with something permanent. (but isn't ball point pen permanent? Maybe not always)

Ok, next I cut out everything I wanted to stay yellow, and then printed with orange.
Here's my print, with the first color, yellow, and the second color, orange printed over it.   I tried to line up the block with edges of the print, but I was off.  I did 4 of these prints and they were all a bit off register.  If the drawing hadn't transferred to the print, maybe it wouldn't have looked so obvious!
I chose red for my next color.  I'm finding out that the foam is ok for big shapes, but not for small delicate ones!  Even using a sharp x acto blade. 

Then, my next and final color was a dark brown.


and here is what is left of my printing block.  Which makes me wonder... when using a lino or wood block, after all that cutting work you're left with a printing block that can't be used again.  But, maybe that is what makes it special.  The number of prints you get from this one time only  process, is all there will ever be. 

So, I didn't wind up with any useful prints, but I learned a lot from it, and I had fun.  I will definitely be trying this again.  But, maybe next time I'll get brave and use linoleum for a cleaner cut design.  And spend more time planning the colors of the design and a way to line them up correctly!

Friday, August 22, 2014

Fun Creating....

Collage, Abstract painting, drawing, stamping, stenciling... so many techniques and so much fun!   I have been so very inspired by Jane Davies blog, Collage Journeys. over the last few months... the abstract colors and textures of paint and collage and various techniques used together in a piece of art is so exciting to see.  I watch her many demo videos and  I've been wanting to create things like this, but don't quite know how to go about it.  I figured out, that you just have to dive in and try something, and go from there.  It's freeing, because there's no right or wrong in the beginning... you can just watch what happens as you create.  Then as you go along, ideas start to come, and things evolve. 
Recently Jane posted a fun challenge on her blog, encouraging anyone who wanted to try, to create a piece of abstract art, with whatever techniques they wished, and then, divide the piece into 4 smaller post card sized pieces, to see how each one comes out looking!
I started by using my Gelli printing plate to make some interesting and colorful designs on my paper that I could use to build on.  I got carried away making print after print, it's addicting!!!  But, I picked out a couple to add other techniques on top of.
The first one I worked on, I was too aware of the end result of dividing the piece in 4, and wound up focusing on each quadrant too individually.   I think now, I put too much into it...maybe less is more... It still was fun to do, and I like how it came out, because I've never make anything like this before!  And a couple of  the cropped out sections look really interesting to me!


work in progress pic

finished

cropped section

another cropped section
Over the next few days, when I had time, I worked on them again.  I thought I had a favorite, until one night, I decided to do something different,  and just started painting with a few selected colors on a white sheet.  Then I added pieces of collage paper, and stenciled and stamped, and painted a bit more until I was satisfied with it.    I found I liked it best upright, but it doesn't really have a right side up. It's  8.5 x 11 inches.
 It was fun to discover what it looked like cropped into 4 sections...  the challenge was to make them so they didn't look like they came from the same piece.  These look to me like they are all from the same piece. 


I made a few pieces, and they all came out so differently, so exciting to see! 
It was great fun to do, playful, relaxing and enjoyable.
I made many pictures... here are a few:
stenciling over gelli print.  I also made the stencils, I traced the design, and cut from clear page protectors. 

This one started from a page of paper I had been rolling excess paint off my brayer.  I added to it, and  the sections of this one seem to look more like they didn't all come from the same piece. The stamp in this piece was made from the stencil of the same design.  I traced the shape on fun foam and cut it out, and glued the shapes to a piece of white foam board.  The red piece of collage paper had been imprinted with plastic wrap in the wet paint.


Below is a previous picture of the work above, on the right side.   The page on the left, started the same, with excess roller paint, rolled off, and I added a scribble of blue w/c crayon and brushed water to blend.  It's fun to see how unintentional things you do happen to catch your eye.


This is another full page, 8.5x11 card stock..  I'm not sure how I started this one, but, it has a bit of stamping, stencil and the red I painted on with my finger.  Below, are cropped sections.


 And here are a few others I thought were interesting...


A Gelli print, printed in 2 layers. A violet and blue layer, combed through.. and a yellow layer.. the yellow paint was dribbled onto the plate and rolled through and repeated sparingly.
And a post card sized collage piece with hand painted paper and butterflies, cute!


I could go on and on, but this post is long enough!  Thank you for visiting and looking at my art work!

Wednesday, April 9, 2014

Painted Paper Flowers

From time to time I get out my acrylic paints and do a bunch of painted papers... it's so much fun.  I never know quite how things will come out.  I used a couple of butterfly stencils that I cut out myself for some of these.  I used a plastic page protector to cut the stencil from, and it worked out better than I thought it would! 
I'm accumulating quite a pile of papers, and I always planned on doing some sort of collage with them someday.  But, so far, I haven't really had any ideas of what sort of collage to do.  I look at other's work online, and that is inspiring, but when it comes to thinking up my own ideas, I just don't know where to start.

Over the weekend, I ran across some youtube videos showing how to make paper flowers, and butterflies, and I was so excited to try it!
Here is my little flower shape and the paper I cut from..

Click on any image to enlarge

...then I coated them on both sides with some watered down white glue.   Each flower takes 3 of the shapes.. then you carefully cut and shape them, and hot glue them one inside the other.


I made 3 flowers and one butterfly.  The butterfly is made from a piece of decorated scrapbook paper.  It was so fun!!  I suppose I could use them to decorate a package, or who knows what else :)

Sunday, February 9, 2014

Experimenting

I wondered what kind of effect I would get if I tore pieces of newspaper, and glued them down.. then painted in some shadows.  It came out looking  pretty cool, the shadows gave it a 3 dimensional look.  I couldn't figure out how to add painted objects over the paper though,..so I left openings to paint the ivy leaves into, but I don't know that that will work out. I'll have to try this again.
Just trying out some new things to see what happens.  I figure that if I at least just do something, things will start to happen, and more ideas will come. 
I drew a grid on this larger sheet of white mixed media paper.  And filled in the grid with a design.  Then I started to cut pieces of newspaper and other papers to fit in the spaces.  I used some white paint also to lightly go over some of the print.  I didn't have any ideas of what I would do with this, I just wanted to cut and paste and see what happened.
I used paper I had painted, and other decorative papers, and magazine paper to fill in the little shapes.  It started to look like a collection of colorful tiles, or a mosaic.  It was fun, and an interesting experience.  I don't know if I like it better in the beginning stage or how it ended up! I think I like both.